- Solutions
-
Products
-
Resources
Sales Automation Tools | Cirrus Insight by Kristi Campbell View all Blog Posts >Get the App, Get the Sidebar, & Get Your Trial Going HereUnleash limitless growth opportunities by partnering with Cirrus Insight.
- Pricing
May 2021 Release Notes
This release introduces new settings and tooltips to the Dashboard for both users and admins, along with other minor updates and fixes.
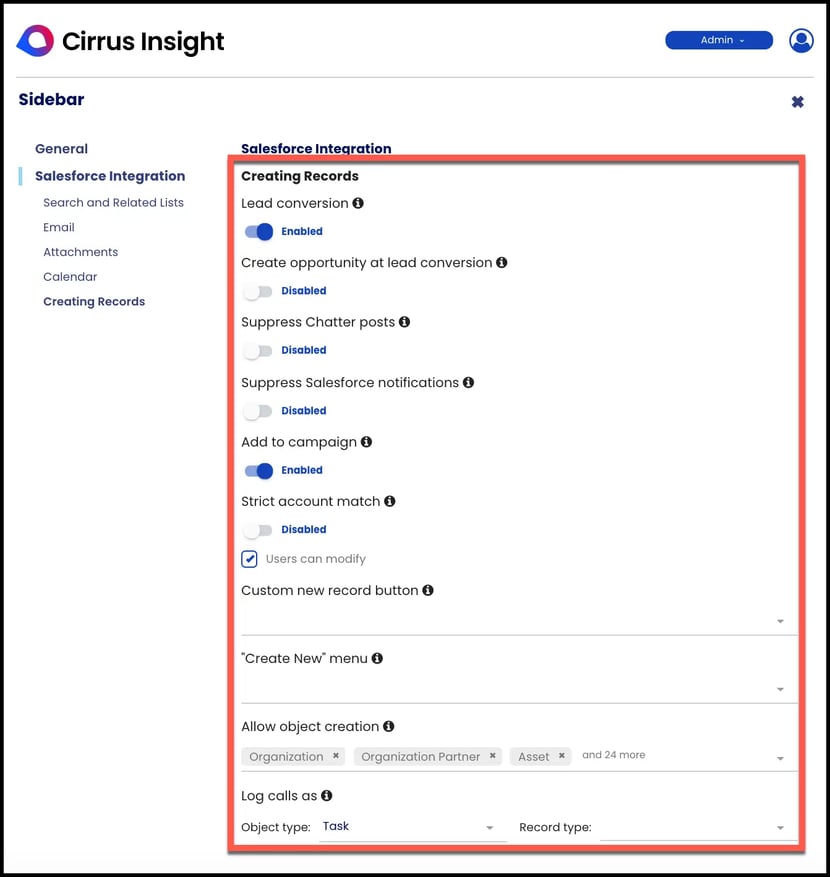
New Creating Records settings have been added to the Admin Dashboard, along with new tooltips that describe their function.
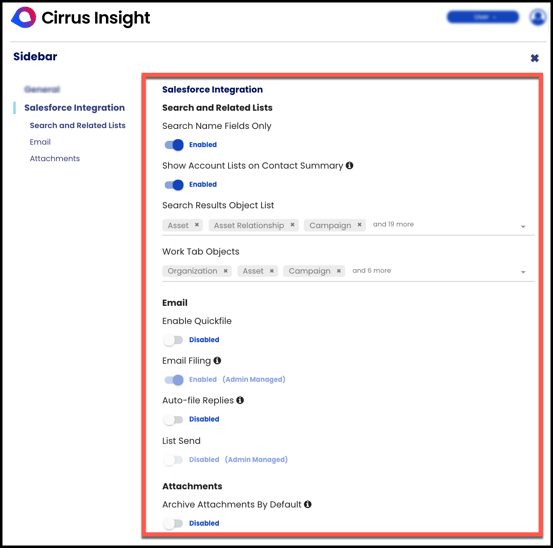
Users can now control all Sidebar settings from the User Dashboard. New settings join existing settings that previously had to be set from the user’s inbox Sidebar.
Creating Records Settings (Admin)
The all-new Creating Records settings allow Admins to fine-tune the process of how users create new records from the Sidebar.
The settings names and their tooltips are included below, but to learn exactly what these settings do and how to adjust them based on your org’s needs, review How do I customize Creating Records settings from the Admin Dashboard?
| Setting | Tooltip |
| Lead conversion | Displays an option to convert leads to contacts |
| Create opportunity at lead conversion | Displays an option to create an opportunity when converting leads to contacts |
| Suppress Chatter posts | Prevents Chatter posts being created for Sidebar actions |
| Suppress Salesforce notifications | Prevents Salesforce notifications being created for Sidebar actions |
| Add to campaign | Displays an option to add a contact to a Salesforce campaign |
| Strict account match | When creating a new person record, only autofill the account field if that account has a 100% email domain match among its person records. |
| Custom new record button | Adds a button when interacting with unrecognized email addresses to create a new record for a custom object (specify below) |
| Create contacts for person accounts | Allows contacts to be created when using person accounts |
| “Create New” menu | Control which objects appear in the “Create New” menu (users will only see objects they have permission to create) |
| Allow object creation | Records can only be created for the selected Objects (restricts Salesforce creation permissions) |
| Log calls as | Specifies the Salesforce object to use for the Log Call feature |
Sidebar Settings (User)
Users can now control their Sidebar settings from the User Dashboard. Previously, the settings Automatic Email Tracking, Quickfile, Archive Attachments By Default, and List Send had to be set from the user’s inbox Sidebar. Although these settings can still be adjusted from the Sidebar, this release brings them into the Dashboard alongside several new settings, all of which are outlined below.
| Setting | Description |
| Automatic Email Tracking | Automatically inserts an invisible tracking pixel into emails |
| Setting | Description |
| Search Name Fields Only |
When enabled, the Search function will only look for your query in primary fields such as Name, Title, and Subject (for a full list of fields, review the “Name Fields” section of Salesforce’s Name Field Search Group). This increases the accuracy of searches but may result in fewer results. |
| Search Results Object List | Reduce the number of objects shown in the Search menu within the Sidebar, making the list more manageable to navigate. By default, all objects that a user has permission to create will display in the Search menu. |
| Work Tab Objects | Reduce the number of objects shown in the the Work tab within the sidebar, making the list more manageable to navigate. By default, all objects that a user has permission to create will display in the Work tab. |
| Enable Quickfile | When enabled, allows email filing to Salesforce with a single click. This replaces the File Email button and bypasses the screen that confirms (and allows editing) of related records. Email Filing (below) must also be enabled. |
| Email Filing | When enabled, allows emails to be filed to Salesforce. |
| Auto-file Replies | When enabled, any replies to a previously filed email will be automatically filed. This is the semi-automatic alternative to fully automatic Email Sync and fully manual email filing. |
| List Send | When enabled, allows emails to be sent to a Salesforce contacts list or leads list. |
| Archive Attachments By Default | Automatically include email attachments when filing emails to Salesforce. |
Minor Updates & Fixes
-
When no email is opened (main inbox view), the Sidebar shows the Cirrus Insight unicorn mascot with the prompt “Select an email to super charge your inbox”.
-
The user authorization screens for email and Salesforce include an updated Cirrus Insight logo.
-
Super Admins can change payment method and add billing information for Direct Invoice.
-
Synced Salesforce event IDs now successfully display on the Calendar Scheduling > Meetings page of the user Dashboard.

